Simple valentines' day heart with cool effects
In case you have no present ideas, this may be just in time :)
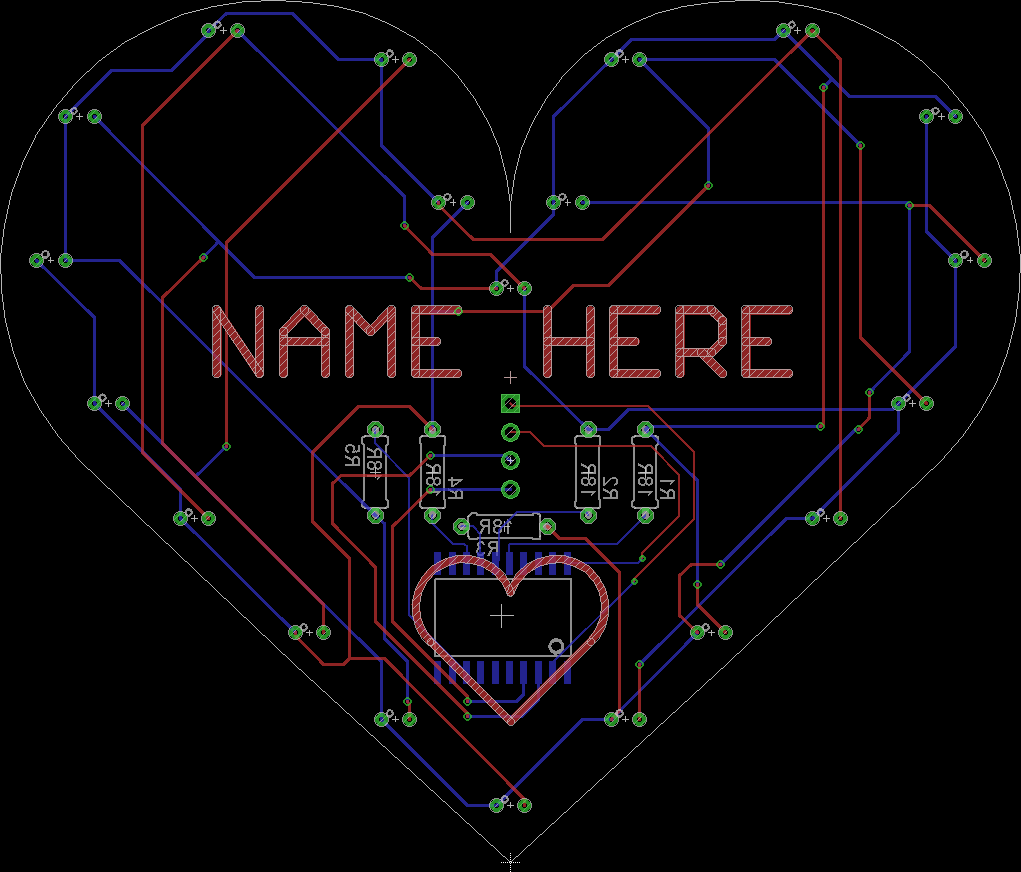
In case you're still a present short for v-day, here's a project you can do. It is a PCB heart with 20 LEDs on it. Each is individually controllable through 256 steps of brightness at a refresh rate over 60Hz. Also provided are a few cool effects which will randomly be chosen to run for 30 seconds or so before moving on to the next. The LEDs are charliplexed, making this rather difficult to do at good brightness and speed, but it does work :). The board also features a metal heart (copper, no mask) and a space to write out the name of whom this is for. The gerber files I included here have no name (in case you're too lazy to generate your own).
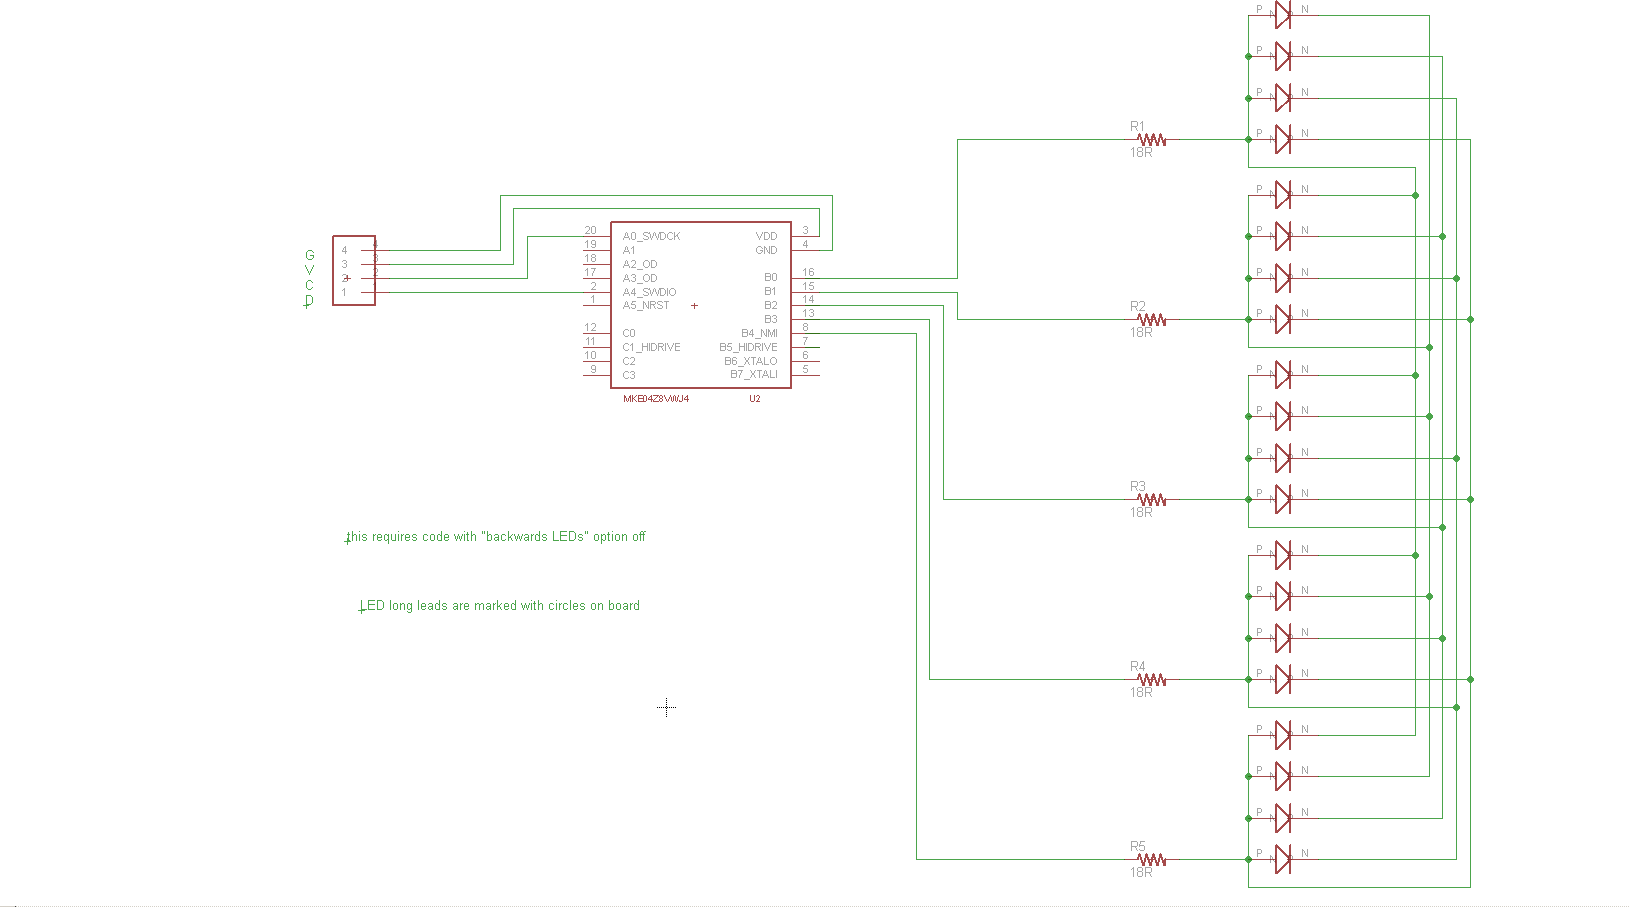
The hardware was chosen specifically to make this an easy project to build. The microcontroller can run on any voltage between 5.5V and 2.6V. It also needs no external components and is fast enough for our purposes. I speak, of course, of the Kinetis KE04 series from NXP. For extra credit, this chip also comes in a few package types - some small, some easy to solder. This was important as this project was designed for two difficulty levels. In "easy" mode the project uses all through-hole parts except the microcontroller (which is used in an easy-to-solder SOIC package). In "advanced" mode all 0402 (front) or 0603 (back) parts are used for a neater look, and the micro is in the much-smaller TSSOP package. The code is common to both the layouts.
The code is pretty simple. The files called "leds.c" and "leds.h" are the LED driver and you need not mess with them. They expose a simple API: a double-buffered tear-free framebuffer. The swap call waits till the buffer has been swapped in. Backbuffer remains valid and can be used to draw the next frame. The files called "time.h" and "time.c" provide a method to get current uptime. This is used for various timing things. The granularity of the returned time is 1 CPU cycle. The file "main.c" has the effects and glue code. Each effect runs until a given timeout (passed as a param). They are selected using playlist-random method. That is to say they will all run before any is run again, but the actual order between them will differ each run. The chip's unique ID is used as the random generator's seed, so each device you build will always act different from others. In the video you see above, shown are all the effects in action. In video order they are: diamonds, comet, waves, vegas, beats, builder, and finally waves again.
The diamonds effect looks like a bunch of glittering lights. This is accomplished rather easily by fading each light slowly, and occasionally picking one to brighten. The comet effect looks like a comet flying around the heart in a random (clockwise or counterclockwise) direction. This is accomplished by slowly fading each light, and keeping track of which next to brighen as the comet head. The waves effect is pretty cool. It simulates a wave of light passing over the heart. The precise location of each LED is known, so the distance from the wavecrest to each can be calculated, and from it - brighness. The result is rather realistic. This effect randomly picks one of 4 wave movements and a directoin. The vegas effect simulates the famous vegas sign lights, but with a small twist. To make sure your brain sees them as moving, it is a 3-step cycle and not 2. Each light in the given direction is first lit to full brightness, then 1/8th, and then none, clearly showing movement in the chosen direction. The beats effect shows a beating heart (who would have thought, eh?). This is done easily by fading all lights, and when they all get too dim, relighting them all to max brightness. The builder effect builds the heart-shaped structure by shooting a dim fast "light brick" from the center of the heart towards the structure being built. Then it gets there, it gets bright, and the next light is sent. Once the entire heart is built, it is destroyed using the same mechanism - one "light brick" running away at a time.
The BOM for the "easy" board is 1x MKE04Z8VWJ4, 5x 18 ohm PTH resistor, and 20x White LED. For the "advanced" board, it is 1x MKE04Z8VTG4, 5x 0603 18 ohm resistor, and 20x 0402 White LED. Here you can see the schematics and the two boards. Click any for a larger view.

As mentioned, I am including all the sources necessary to build the project, a ready-to-flash binary, as well as eagle files for the boards and schematics. For the especially-lazy, I am including ready-to-send-to-your-board-house gerbers. They do not include a name on them, nor the "NAME HERE" placeholder, so if you're ok with no name on the board, you can send them off to be made directly. As always, the license is: I make no warranties about this code or hardware design. I make no promises that it is fit for any purpose. Usage of this code and of these hardware designs is at your own risk and you may not hold me responsible for any consequences, be they direct, indirect, or coincidental. You may use this software and hardware designs for non-commercial purposes. This license and the copyright notices in the code may not be removed from the code and must be supplied with all binaries produced from said code. All commercial use is forbidden. If you would like a commercial-use license, contact me at me@dmitry.gr. The => [Download] <= is here.
