CortexProg

The era of Cortex-M & the complications it brings
ARM Cortex-M chips are slowly replacing various 8-bit micros in everything both hobbyists and professionals make. This is generally a good thing. It does bring some changes. Back in the days of 8-bit, there were basically two mainstream factions (AVR & PIC) with a few weird options on the side (8051, etc). This meant that one had one programming tool for PIC, one for AVR, and thus was all set for pretty much any situation. Each camp's tool supported some level of debugging, tracing, and flash programming. With the new Cortex-M chips things are not so easy. There are many manufacturers making wonderful chips, and they all have their own ways to program their chips. This gets out of hand fast. There must be a sane solution. There are a few. The main ones ar JLink and ULink. Both support many chips, and both cost hundreds of US Dollars. That is not a very friendly price. There are also a few open source solutions, but surprisingly they also cost a bit of money and support fewer things. So, what can we do to fix this?
There is no way it can be that bad, one might say. ARM chips are usually based on standards that ARM documents. Well, that is true. But in this case, that doesn't help much. The ARM debugging standard only covers things like reading and writing registers and memory. There is positively nothing said about programming flash. And why would there be? Every vendor does flash their own way. Forcing them all to comply with a restricting spec would get in the way of some of the creating things they could otherwise do. All of this still leaves the users in a bind, however. I wanted to help.
From humble beginnings...
So how does one bootstrap an ARM Cortex-M debugger? Well, one has to implement it on a chip one already has. For many hobbyists (us included), this means something 8-bit. Like, AVR, for instance. So that was the start. Using the ModulaR bootloader on an ATTiny85 leaves 4.75K of space for code. Could one fit a working ARM Cortex-M debugger, a protocol to talk to PC, and all the necessary glue code in there? Turns out... yes
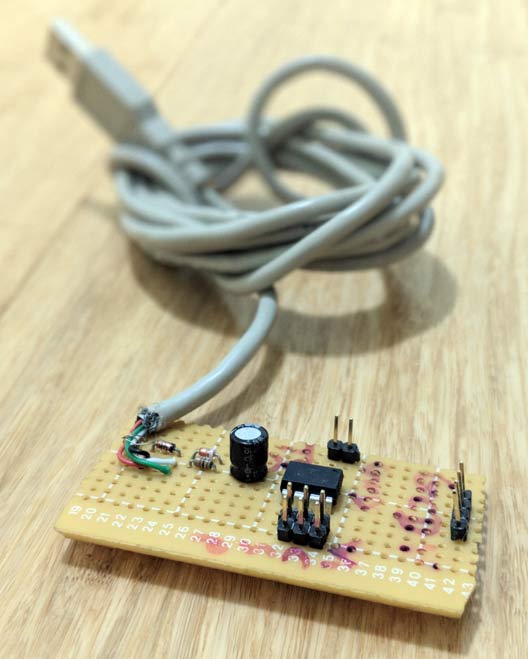
The very first version of the CortexProg hardware was hand-assembled on a perforated board out of a minimal number of components. Remarkably (and on purpose), this board is still supported by the PC-side tools and has all the necessary features to remain useful. Occasionally I take it for a test-drive to verify this. Why does it matter? Because if you're looking to make a dive into Cortex-M based projects, you probably have all you need to assemble one and use it right away.
So, what does it take?
Debugging a Cortex-M chip over SWD is relatively painless. Implementing an SWD debugger decidedly less so (See ADIv5.2 spec). The protocol has many layers. This is good in terms of understanding it conceptually, but kind of annoying when trying to look at a signal trace in a logic analyzer. Here's how it works. On the bottom-most layer we have the wire-protocol. SWD requires three wires: IO, CLOCK, and GROUND. The clock is always driven by the master (debugger). The IO wire is driven by both, in turn. All transactions are master-initiated. Each successful transaction transfers 32 bits of data either from the debugger or to the debugger. The transaction header contains metadata. The parts of interest are the 2 bits of address and 1 bit of address type. Address type determines whether the transaction is addressed to the SWD hardware itself (Debug Port aka DP) or to whatever it is attached to (Access Port aka AP - the layer above it). The number of address bits (2) may seem a bit strange. That seems like very little, does it not? Yes. Yes it is.
So it's like SPI, right?
Ha. No. SWD is not really like anything. Its closest cousin might be SPI, if you got SPI to use a data line bidirectionally and added variable-bit-length transactions. This means that the ATTiny has no hardware units that can help us with making SWD work. My initial code was written in C. It worked but it was dismally slow. After finishing debugging, I wrote it all in AVR assembly for a huge speedup (more than 10x). At this point I think it is about as fast as it can be on the AVR - it averages 1.4Mbps (with clock speeds between 8MHz and 1MHz). This code is in wire-avr-asm.S and you might find it of interest. In reality SWD speed is not really the limiting factor - the i/o via v-usb takes more time than SWD for this AVR version of CortexProg hardware.
Ok, the bits are working, what about bytes?
Obviously 2 bits of address are not really enough, so at address 2 we have a register that we can write with a few more bits. The top 8 determine the access port number we're talking to (higher layer). Bottom 4 provide 4 more address bits for the DP, next 4 are the same for the AP. So now we can address a total of 64 addresses in the DP and 64 in the AP. Still not quite enough. What's the next layer?
If we enumerate all the APs we can access (there may be more than one) we can find the one that allows access to the AHB bus (MEMAP). This is where all the peripherals and memories usually reside. The CPU core is also connected to this AP. MEMAP has registers that we can write an address into, and another we can read and write data through. So here, after 4 layers of indirection, we can finally write a 32-bit address and get 32-bit data. Phew...
Are we there yet?
An astute reader may notice that we've only gotten to reading and writing RAM. How does debugging work? There is yet another level of indirection for this. In private memory space in all Cortex-M class chips, one can find debug registers. They allow various types of debugging to occur, including an indirect way to read and write registers, stop and start the CPU, and even trap exceptions. This, together with a lot of glue will get one to a point where it is possible to do rudimentary debugging.
But wait, there is more! We still haven't gotten to programming the chip's flash. However, we have arrived at the end of ARM's specs. Each manufacturer has their own methods of doing this. Some even have multiple completely different methods based on the chip family or model. This is why they each make their own flashing tools. This is why this project was initially started. The goal was to make CortexProg support as many chip types as possible. An important secondary goal was to allow chip types to be supported by easy-to-get-and-install plugins so that users could make their own and share with others. We managed to make this work. But before one even tries to flash a chip, it has to be positively identified. This is not as simple as one would expect.
To ID a CPU
Reading the ARM debug specs, there are a few things that would give one an idea that this might be easy. First of all, the DP has an IDCODE register which can be read. It will identify the chip for us, right? Not so. Besides telling us the version of the DP, it does little else. Let's look deeper. Cortex-M chips have a CPUID register. Surely this will tell us the specific microcontroller we're dealing with? Again, no. At most, this tells us the Cortex-M type (M0, M0+, M3, M4, M7, M23, M33, etc). This is not enough to separate an LPC812 from an nRF51822. What now? A deeper look at the specs shows us that a things called a ROMTABLE exists, which has a more detailed info on the CPU. Definitely, this is it, right? Well, still no. But this is a good start. The ROMTABLE in most (but not all) chips can definitively tell us the manufacturer of the chip and a manufacturer-assigned "model id". What this means is up to each manufacturer. Some are nice enough to identify each family with a different model ID (Cypress, for example), some only update the model ID when flashing methods change (Nordic, for example), and some just assign IDs haphazardly (STM, for example). So is there no hope?
Many manufacturers have come up with their own methods of doing microcontroller type identification. Almost all have some memory address that can be read to get the identity of the chip. The problem is, the address differs between each manufacturer, or even chip families from the same manufacturer. This makes a plugin-based microcontroller-support we had desired complicated. But not impossible! We solved it by first identifying the chip maker, then seeing which scripts can support it, and letting each try to ID the chip by looking for these magic registers. This seems to work, and the users never need to select the "chip type" from any lists. Cool!
So now we can write flash?
Yes! We can now write flash. Each plugin first identifies the CPU type it is meant for using ROMTABLES and additional manufacturer-specific methods. If it is a match, the plugin sends code to the CPU's RAM that is used to program flash. Then the data is sent to RAM piecewise and is programmed. The basic operation supported are: EraseWholeChip, EraseSector, WriteSector. Sector sizes differ per chip type, but never fear, CortexProg will tell us the chip's sizes. How? The plugin determines them. This allows us to share the same plugin for the chips whose only difference is flash size.
Plugin structure
Each plugin is composed of a few pieces. At the end, we have identification information. this is used to properly identify the chip. There is also a user-readable device name so the user can be told the identification worked. Besides that there is the code to upload to the device. The code has 7 basic entrypoints, all of which are optional. First three are initialization, called in order. Next is ChipErase, then SectorErase, then SectorWrite, and then Cpuid (which assists with cpu identification). There is also a way for the plugin to request the debugger set a breakpoint/watchpoint anywhere in memory. This is used for some chips whose ROM must be allowed to run before flash is usable. Each plugin is simple, and in the souce code are included a few samples and a document to help you write your own. Sharing is encouraged.
The plugin code is copied to RAM (location is determined by plugin source). Then each of the three init entrypoints is called, giving it time to determine chip flash size and initialize flash. After this, CortexProg will read the addresses dedicated to FlashAddress, FlashBlockSize, FlashNumBlocks. This will be presented to the user, and then further operations (like reading or writing flash) will proceed.
Debugging, tracing, and more
Programming code into the chip is great, but there is more to be done! CortexProg allows real debugging. The PC-side utility includes a full GDB server, so you can attach GDB to your running program and do source-level debugging. But there is more! CortexProg allows synchronous printf-style output as well, direct to your console. All this without a need for any extra wires, unlike other solutions! With this, one can log things direct from the application with no fear of missing a byte.
Since each specific microcontroller has a limited number of breakpoints and watchpoints supported, CortexProg intelligently manages this so that you do not have to. It all just works for you. Pretty sweet!
Another possible use case for CortexProg is flashing many boards at once. Multiple CortexProg devices may be connected to the same Pc at the same time, and the PC-side tool can control each individually very easily. This allows for very easy parallel-programming of hundreds of boards, a lot cheaper than many alternative solutions.
PC-side tools
HID protocol is used to allow driverless operation under all operating systems. The main CortexProg tool allows debugging, programming, erasing, writing, and some special functions (like unlocking locked chips). The source code for the PC-side tool is provided, of course, and you can write your own as the protocol is very simple - it is based on the ModulaR protocol.
The protocol messages allow both high-level things, like reading and writing large blocks of data to RAM and reading and writing CPU registers, as well as very low level things like doing a single SWD transaction. So whatever you wish to build on top of CortexProg - you can do it! In fact, the PC-side tool can even speak ModulaR's protocol to allow firmware updates (and even initial upload), so you do not even need ModulaR's uploader for updates!
The tool builds fine under Linux and Windows (XP or later). You can always find the latest sources and binaries on the official CortexProg website.
Windows Compatibility
Windows may allow driver-less HID, but it is not nearly as painless as it is in Linux. Linux is very permissive about what you send to the device and what you get, as long as the message size is under the report size you promised in your hid report descriptor. Windows is the opposite: it obsessively makes sure that you follow the HID spec to the letter. This means that your descriptors must be exactly right, and you may only send as many bytes as your descriptor says - no more, no less. This is a problem since for maximum speed you'd want to use packets as large as possible, but then for small packets you'd still be obligated to belt out the large mostly-empty packet anyways. Plus, this only came out when trying to build the CortexProg PC-side tool under Windows. At this point the entire comms protocol was already well-designed and stable for months. Oh, and it relied on variable-sized messages...
"Well, out the window that goes," you might say. No. I saw no reason to penalize Linux users for Microsoft's choices. Instead, suport was added for the tool to do this padding, and for the firmware to reply to padded packets with padded packets. It is called WinPadding in the code. If the PC sends a WinPadded packet, CortexProg will from that point on always reply in WinPadded packets. Linux never sends WinPadded packets and thus benefits from higher speed.
A futher optimization is to declare a few report sizes and pick the best at any given time. Sadly there is not enough RAM in the AVR to make significantly large buffers work, so it is not worth it. The faster official CortexProg hardware does employ this method.
Scriptability
CortexProg is scriptable with Lua! You can create arbitrarily-complex flows of processes with it. This is called a "special script" in the CortexProg manual, and there is a whole section on this in the Developer's page on the official CortexProg website.
How to build one
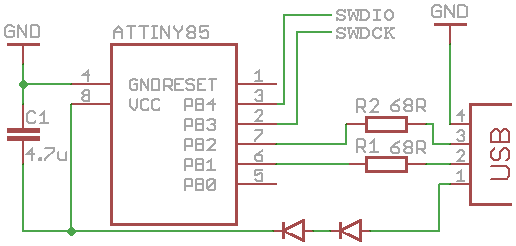
First of all, you'll need an ATTiny85 board running ModulaR v2 or later. Head on over to ModulaR bootloader's page for details. Once that is done, connect SWDIO to pin B4 and SWDCK to pin B3. That is all! The basic version of CortexProg is just this. It is not stellarly fast (nothing based on V-USB is) but it works and will allow you to slowly program and debug any 3.3V Cortex-M based board. How fast is it? Flash can be read or written at about 800 bytes per second. This may not sound like a lot, but in many cases all you'll need to do is load a real bootloader to your ARM board. So for that, this is good enough.
The license on this code, is as follows: this code maybe used for your own personal non-commercial use as long as this license, the source code (with any modifications), and a link to this page accompanies the code or the device that contains it. You may not use this code for any commercial purpose without first obtaining my permission.
How do we improve on this?
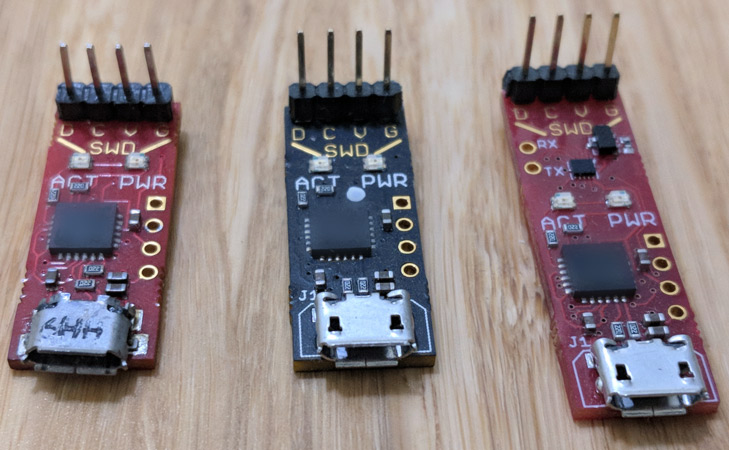
Of course this was not enough. We'd want to debug things with voltages other than 3.3V, and at more than 800 bytes per second. A built-in usb-to-serial converter would be nice, as would a variable-voltage power supply to supply the debugged board with power. In fact, work is on progress on such a device. A few working prototypes already exist and they are already in user hands making them happy. You can see the photos of the first three revisions here. A few startups in San Francisco are using them already as well. And of course all newer versions of CortexProg are flashed using previous versions. (The very first board were flashed using the AVR-based CortexProg hardware.) This is where you come in. If you'd like to help make super-cheap fast CortexProg debuggers a reality, please head on over to the KickStarter page and help make it so. The goal is to be able to sell these for under $30 USD each. At this price point, it will be the cheapest ARM Cortex-M debugger one can buy. Why? So that everyone can get into ARM-based programming for much cheaper than AVR or PIC programming ever was!
Read more about CortexProg (and downloads)
Here is the Official Website, which includes a developer manual, a user guide, and more information as well as other links and resources. You may download version 1.1.0.0 of the AVR sources and the PC-side tool sources [here]. Further updates will be posted on the official website and this home-made AVR-based design will continue to be a fully-supported variant of CortexProg.
