LED pendant (8x8)

Intro
There are a few project floating around the web with people who've put a microcontroller behind an 5x7 or so LED matrix. They all have a lot in common: they sort of show an image or a simple animation on said screen in monochrome (on or off) pixels. This seemed uninteresting to me, but I did want a pendant that could show shings, so I made this one, and wrote the code for it. It supports 16 levels of brightness per pixel and is 8x8. The micro used is ATMega328p. Currently the code space is very under-used, so a smaller micro could be used.
Interrupts
Having to stop your work on preparing the next frame, or write your code in a special fashion to avoid glitching and janky animation is no fun, so instead interrupts can be used. The code I wrote entirely hides the double-buffered 4bpp display behind a convenient API and does not require any code structure of the main code. The interrupt fires at variable rates between 488Hz and 3.9KHz, producing screen refresh rate above 30Hz, which is smooth and not flickery to the naked eye. The duration of LED illumination is not uniform because of the variable timer rate - this is by design. Since each bit in the 4bpp that our brightness is represents a different brightness increase, we give each more significant bit a longer time to illuminate the LEDs. Flipping the buffers is an instant no-copy operation.
Demo(s)
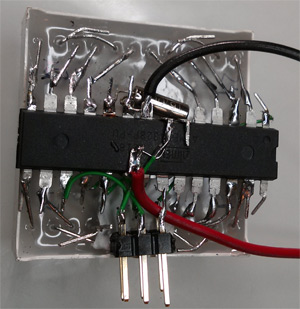
The demos in this code are simple. The first simply sets brightnesses of each pixel randomly, waits a bit, and does it again. This actually looks kind of cool. The second demo is a fire-like programatic animation. It generates a fire-looking show via some simple rules. The last demo is Conway's life on a toroidal surface (rows and columns both wrap around). But since 8x8 is a bit of a small grid, this demo also supports bigger fields, which are then zommed out, and brightness of each pixel represents how many of the cells it represents are alive. At x8 maginication this looks awesome, and, in fact, much more random than the "random" animation. The code optionally supports a crystal. you may want it if you want to add USB connectivity to your patrix, else the internal oscillator is good enough. I added a 16MHz crystal to mine, as you can see to the right.

Hardware
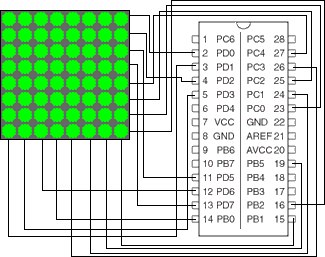
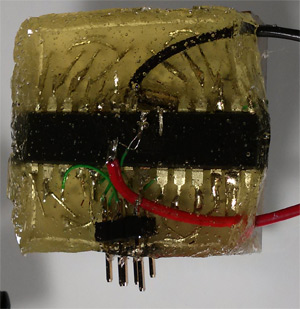
Making the pendant was not terribly hard. The schematic is shown above. The wiring may seem rather random, but this is not so. Turns out most of these LED panels have very strange pinouts, and in fact the wiring I specified allows you to dead-bug the atmega onto the matrix with very little effort. The matrix I used has rows connected to the negative ends of the LEDs and columns to the positive ends. If yours is different, rotate it 90 degrees :). If your matrix requires different wiring, the code is easily changeable to support this (see arrays "gRowsX" and "gColsX" where X is B, C, or D). After wiring up the matrix, ICSP pins, and the power wires (also what holds the pendant on our neck), it was time to waterproof it. Epoxy is very very awesome, and exactly the perfect tool for this. Duct tape was used to make the shape to hold the epoxy, and it was allowed to cure overnight.

Source
The source code is published under GPLv3 license. I hope that this radically improves the average quality of LED-matrix pendants that you have made or plan to make, hehe. Download: [HERE].
